Set Design - Building 1/4 Scale Physical Model - Part 2
- Konstantin Sumtsev

- Jul 25, 2018
- 3 min read
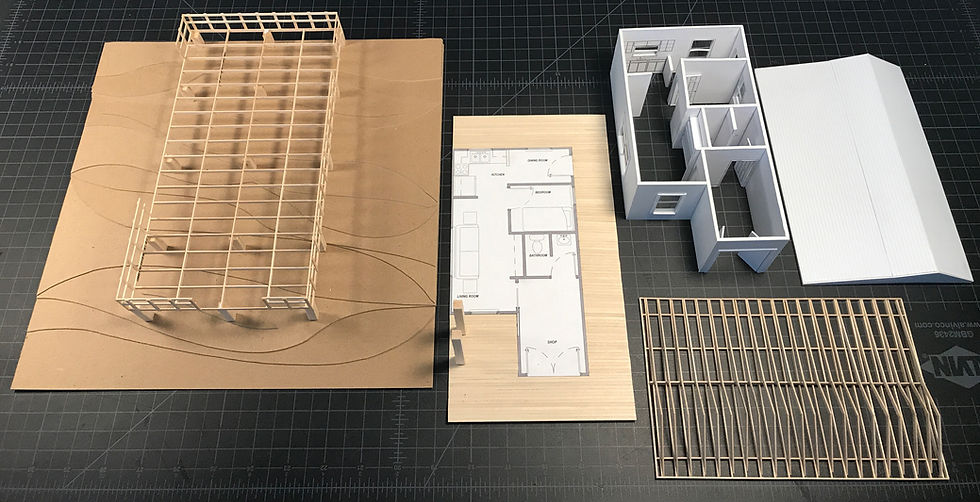
Let's begin by building the base of the model, deck frame, and pilings. The base will serve several purposes: to place the model onto a solid surface and to give it a real-world terrain look. Since this set is being built on pilings submerged in water, it's natural to assume that the sea floor is not flat but rather a gradual descent down. We will replicate this using one of my favorite materials: Chipboard
1) Lets begin by marking the chipboard into 12 equal squares measuring 12"x12". Don't rush this. Remember: measure twice, cut once. Once everything has been marked begin by cutting each square. Using a sharp blade & metal ruler cut in several passes. This will guarantee and clean & precise cut. Tip: Use new #11 blades. If the blade is worn out it will tear the material. Blades are a lot cheaper than rebuying the chipboard.


2) In order to achieve a sea floor terrain look I decided to use french curves for very smooth lines. I outlined the shapes first at various distances (to show elevation progression) with a pencil and using a knife I slowly cut through in several passes. Take your time on this as mistakes will be easily noticed. Note: If I was to build the same set on a flat ground or a hill I would not use french curves but rather cut chipboard with straight jagged edges to indicate the terrain since we tend to build things in a very organized fashion with many straight lines and shapes. If you have ever flown and looked out the airplane window you will see that the ground below is usually shaped in perfect squares or rectangles.

3) Start by gluing from the bottom up (biggest piece to the smallest). I used Elmer's Carpenter's Wood Glue as it tacky yet allows you to still move things into place before it begins to set. Note: It does leave a yellow residue so I would have a paper towel near by to wipe off any extra glue that seeps out. Sobo White Glue would also work as it has similar properties to wood glue but dries clean & with less tension. I would not use Elmer's White Glue as it's not strong enough and you risk the pieces falling apart. Great glue, highly underrated but not for this task. But I do promise we will use it.
4) Once everything was glued together I put several heavy books on top (reference book seem to have a nice weight to them) and let it dry. Instructions say that 30 minutes should be enough but for the strongest bond I would leave it overnight.
5) While the base is drying, let's build the floor frame. For most set design or architectural models you will not need to do this but I wanted to show how materials interact together, especially since this set is elevated (not built directly on the stage floor). I laid out printed draft section inside a magnetic glueing jig first. This will insure proper shape and spacing as accuracy matters. I measured and cut all the balsa wood (1/8 x 3/64 x 24) pieces before gluing them. Sanding helps keep all edges clean and straight. I used magnets to keep things down & aligned at a nice 90° angle. I placed a moderately weighted book on top and let it dry overnight. This process is a bit time consuming. Get some good tunes going and enjoy. Beatles or ABBA are always good choices with a supplement of coffee (if required).


6) Time to add pilings. This was a bit of a challenge since the elevation gets higher and pilings get smaller. I placed the frame on the finished base and marked where each piling was going to go. I then measured the height of the chipboard at each piling level that was marked and subtracted from the original dimensioned height on the draft. This was the new height I needed to cut at. I cut balsa wood (15/64 x 15/64 x 24) using a miter box & saw with 1-1/4 Inches x 5 Inches, 54 TPI (teeth per Inch) saw blade. Tip: The more TPI the cleaner the cut. I used this instead of knife due to material thickness as it would guarantee a clean cut and not a wobbly angle cut that I would inadvertently make with a knife. Once everything was cut to dimension I glued each piece with a help from my magnetic glueing jig, magnets, and wood glue. I let it dry once again overnight. Once everything has dried we can join the base and the frame together with wood glue. I placed a small weight to secure them together tightly.


In Part 3, we will continue on to building the floor, railings, and roof frame. Stay tuned!


Comments