Set Design - Building 1/4 Scale Physical Model - Part 4
- Konstantin Sumtsev

- Aug 6, 2018
- 5 min read
Updated: Aug 9, 2018
We are almost done. In this blog we will concentrate on building walls, windows, doors, casings, built-in bookshelves, and window sills using Evergreen Polystyrene. Now, a little bit about polystyrene. It's the most common type of plastic, which comes in both solid and foam. It's used in variety of industries and you probably already have multiple products around the house that are made from it. For this model we will be using scaled thin sheets of solid polystyrene specifically intended for architecture & model making.
Its quite easy to cut polystyrene and should be approached similar to cutting a glass window (if you have ever done that). But here is how you do it for those of us that have not: you need to score a line several times until, by adding a bit of force (up,down, or both), you are able to cleanly break off the piece with minimum/no edge cleanup. However, the thicker the material becomes the harder it is to do so and required more score passes with a sharp #11 blade. It's very important that you use a new blade and any time it becomes dull replace it immediately or it will not cut at all (except maybe you). Tip: Make sure to use a cork backed ruler when making the scores on the material, NOT metal or plastic as they will slide on polystyrene and you might end up cutting yourself. I'm not responsible for missing fingers or other body parts so you have been warned.
1) I printed out all the elevations for my cabin and, using a #11 blade, I cut them out. I then glued all of them leaving a bit of space between each elevation on the sheets of Evergreen Polystyrene (0.80" Thick (2.0 mm) using Elmer's White glue. Be careful when glueing as the ink can be easily smudged due to paper becoming saturated (wet) from the glue. I used paper towels to push the excess glue out and wipe the edges off. Don't worry to much about small bubbles and kinks (within reason) as they will disappear once the glue has cured. Now, I don't think Elmer's White glue had enough adhesion (I had to re-glue several times and even now I have to be very careful when handling). I would recommend using Plaid Delta "Sobo" glue instead. Additionally, since this was the thickest sheets of polystyrene I scored them 4 to 8 times in order to ensure nice edges. Take your time as its very simple to mess up and its better to score few times than having to sand the edges down.

2) Windows were a completely new challenge as you cannot simply break those off at the edge of the score. You still need to score all the sides however this is where power tools come into play. Using a 3/16" drill bit I drilled several pilot holes on the slowest speed. I then used pliers to rip most of the inside out. Then using pliers again I got the leverage to add up & down force to break off at the score lines that I did earlier. You might get some damage outside the window area but I will show you later on how to fix that. I discarded the windows as some were a bit damaged when being cut out.
3) I printed out windows & doors elevations out and using a #11 blade I cut them out. I then glued all of them leaving a bit of space between each elevation on the sheets of Evergreen Polystyrene (0.30" Thick (0.75 mm) using Elmer's White glue. This required about 2 to 4 scores with a knife before I was able to cleanly snap them off.

4) Now, using a magnetic gluing jig I started to assemble the walls. Using the jig really helped ensure proper 90° edges. Accuracy matters as the walls would be placed on top of the floor plan and not glued down. I decided to do so since I wanted to achieve a sectional model where one can see how all the elements and materials come together. I used BSI Cyanoacrylate (CA) glue. It gives you 5 to 15 seconds to get the edges positioned right before bonding. I then used BSI Accelerator (for CA) to accelerate the bonding as some pieces were very small and easy to get out of line if held for too long. You don't need much, maybe a drop or two. Additionally, it does not take much time to cure and you can proceed with building.
5) After having put together all the walls I started to place the doors in. The angle can be anything you want. I would try to stay away from the typical 45° or 90° on all the doors. Mix it up. It will look more realistic in the end. I trimmed the pocked door a bit to show that part of it goes inside the wall leaving a bit of space open.


6) Using Polystyrene (0.30" Thick (0.75 mm) I made 6 shelves using my floor plan as a guide. I glued it down using BSI Cyanoacrylate (CA) glue with BSI Accelerator (for CA). I then cut out 5 window sills and placed them at the bottom of each window. Tip: Using tweezers helped position the small pieces in place until the glue started to bond.

7) For windows that we cut out earlier I used as template for cutting Evergreen Polystyrene (0.10" Thick (0.25 mm) that will be used to simulate glass. I then cut out the middle frame from all the windows and glued it inside the windows. I then placed the glass onto of those frames (from the outside) and glued them down. Tip: Don't add too much glue. Just barely enough at the edges to hold it in place. The clear polystyrene will start turning hazy white if too much is added.
8) Looking at the windows and doors from the outside doesn't seem that great at first. Inadvertently, some edges may not be smooth, might have small pieces missing, etc. It's okay! Breathe! After all, a human is making this, but it's very easy to fix (if you even want to call it that). This is where casing comes into place. I used Evergreen Polystyrene (0.020 x .080" Thick (0.5 x 2.0 mm / 10 Strips) for window and door casings. This ensure the edges are straight, holds the glass in place (covering uneven edges), and most importantly, adds realistic material dimensions.

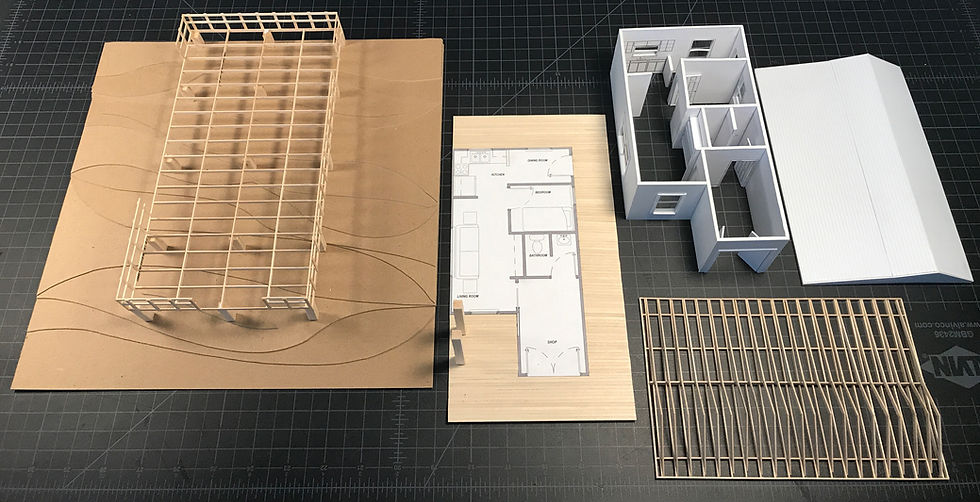
At this point we are completely done! We have completed all 6 sections (Base, Deck Frame & Pilings, Floor, Deck & Railings, Walls, Roof Frame, and Roof). You can now confidently present your design/concept in a physical form. However, before you do so I would strongly recommend one last step-photography.
It's always a good practice to keep photographic record of your work. Additionally, I would also recommend photographing or video recording (GoPro, YI, or DSLR) the progress of your work in various stages, similar to keeping a journal that you can refer back to. It can be in a form of a blog (like this), journal (digital or physical with photos), or a simple Microsoft Word document.
In our last blog of this series we will explore Photography & Lighting for Presentation / Portfolio. See you soon.


Comments