Set Design - Building 1/4 Scale Physical Model - Part 5
- Konstantin Sumtsev

- Aug 9, 2018
- 6 min read
Updated: Aug 17, 2018
Lights! Camera! Action! It's time for lighting and photographing your model. This is your time to shine and showcase what you have achieved. You have spent hours upon hours making this and you don't want to skip out on the presentation. It's a calling card that showcases what you can do. Photography is your answer, as not everyone will have a chance to see your model in person. Additionally, it's a way to bring interest (or eyeballs) to you work through publication to social media such as Instagram, Pinterest, Tumblr, DeviantArt, LinkedIn, and Facebook-- just to name a few.
I will be using the following tools & materials to photograph the model, however, there are millions of ways to do this. This is just one way that worked for me and hopefully will work for you. Try to experiment, as you never know what you will come up with. This is called Art.
The look I'm going for is a clean, non-distracting backgrounds in both white & black. White to bring focus to the model and its details and black to show the effects of interior lighting at night (a light study). I find light study important as you understand how your design affects light & shadows and it serves as a way to resolve issues before you actually build and light the set.
Now, lets begin:
Tools:
Canon EOS M Digital Camera (Any digital camera would work. This is just the one I own.)
Canon EOS M Mount Adapter (Required for EOS M Camera to use EF or EF-S Lenses.)
Canon EF-M 18-55mm f/3.5-5.6 IS STM Lens (Used for detailed close-ups)
Canon EF 50mm f/1.8 STM Lens (Used for exterior shots)
Canon EF-S 10-18mm f/4.5-5.6 IS STM Lens (Used for top/overhead shots)
Manfrotto Befree Live (Fluid Head) Tripod
32GB SD Memory Card
2) LP-E12 Batteries (You will end up rotating them. One in camera. One Charging.)
2) Architectural Lamps
2) 9-Watt (60-Watt Equivalent) Soft White (2700 Kelvin) LED Light
4) Woodland Scenics Warm White LEDs (This is meant for model railroading; however, they are perfect to add interior lighting in small spaces to illustrate scale and real world light study. They come with a dimmer switch that allows for precise light control.)
Solid Table


Software:
Photoshop (or GIMP a free alternative.)
Materials:
White & Black Posters (22" x 28")
Masking/Blue Painters Tape (To secure poster board to the top of the table and wall.)
Tracing/Baking Sheet Paper (To diffuse "soften" light. Helps to eliminate hard shadows and produce a more pleasing image.)
Let's get started. First and foremost lets build our shooting setup.
We will be using both white and black posters. Place the poster against the wall and secure the top and bottom with masking/blue painters tape.
Place the cabin model on the poster. Be gentle as we don't want to get any marks on the posters. Remember: lift don't slide.
We will light the model from both sides using the architectural lamps and the two LED bulbs. If you were to light it from the top certain geometry of the model will create hard shadows. We want to eliminate as many shadows as possible and make those that still exist (for aesthetic reasons) soft and even. For this we will use tracing/baking sheet paper to diffuse the light.
For black poster background we will use Woodland Scenics LED's. Depending on what angle we will be photographing we will position and attach lights in the room that we want to achieve a desired effect. Once you turn on the lights don't crank them up all the way. See what works for you aesthetically and adjust them using the supplied dimmer pack. Tip: Don't tape lights on the printed part of a floor plan. Look for a spot that is blank, as tape has a tendency to lift a layer of ink.


Let's photograph:
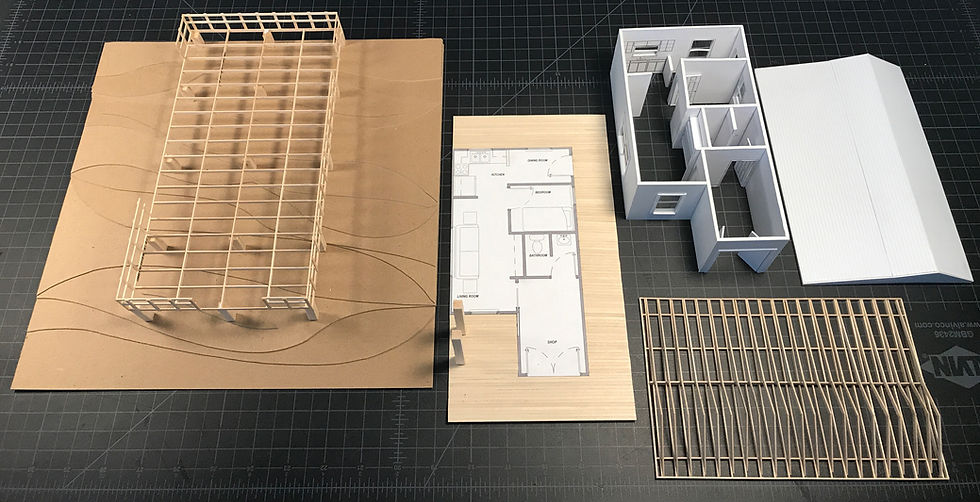
I will photograph this model from all 4 exterior sides in different sections (Base, Deck Frame & Pilings, Floor, Deck & Railings, Walls, Roof Frame, and Roof) and detailed close up on the rooms, and few isometric views. Get as many angles as possible. You can always decide later what you don't want to keep.
We want to go with shallow depth of field so that only the model or specific section is in focus and everything before or after is out. This will also cover any mistakes and soften the edges.
Here is the camera settings that I am using & why: ISO: 100, Aperture (f/1.8, f/3.5, f/4.5), Shutter Speed (1/60'). I was shooting in RAW format as it allowed me to make adjustments in Photoshop (or GIMP) later such as exposure, color temperature, highlights, etc. Lets discuss why those setting were chosen. I choose ISO of 100 due to the level of digital noise. The higher the ISO number the higher the digital noise level (dark pixels/grain showing up on your image). In order to achieve a shallow depth of field (less amount of subject in focus) I went for the lowest f-stop that was available on my lenses, which was f/1.8, f/3.5 and f/4.5. In order to compensate for more light coming in I need to decrease my exposure time. I chose 1/60' as it produced a well exposed shot. Use the light meter found on most digital cameras for proper exposure. The last item that was left was to set the white balance to match the color of my lights which are at 2700K (Warm White).
Now, we are ready to begin photographing. When placing the tripod on the ground (in my case carpet) make sure it's leveled. Although it can be fixed in Photoshop later, you sacrifice part of your image for the adjustment (as it requires a crop) and time as this mistake will affect multiple photos. Do it right the first time.
I secured my tripod and camera in place. I will not touch it except for releasing the shutter; I will move my model instead. This way I will not need to refocus the lens each time. Additionally, this is helpful if you want to combine several photos into one (HDR (High Dynamic Range) Image), where you shoot at various exposure levels and stitch them together (in Photoshop or GIMP) to form an image with greater degree between shadows & highlights.
Since my camera does not have remote shutter release (most do) I set a timer for 2 seconds. This will ensure that no shakes will occur from the time I press the shutter button and the image gets exposed.
Take lots and lots of photos. Unlike 35mm film that typically had 36 exposures in a single roll and you had to wait to get your photos back from the lab, digital is practically instant. Memory Cards (as a replacement for film) hold lots of photos and best of all, you can download them onto your computer and shoot some more. Try different methods, techniques, and exposure levels. In the end you will get few images that you really love and are proud of.
Once you have transferred all your photographs and made selections of your best ones lets bring them into Photoshop (or GIMP). Once you open your image in Photoshop you will be promoted by Camera RAW Utility that will allow you to manipulate your image. It's almost scary how much you can adjust. The power of RAW format is that it's non-distractive as JPEG format is. Adjust until your hearts content. Few things to consider: If you don't like 2700K temperature (warm white) you can adjust the color temperature to 6000K (cool white) for instance. I would also make sure to enable Lens Profile Correction. This corrects different types of lens defects at certain focal lengths, f-stops, and focal distances. Don't be afraid to crop your image especially if you didn't get the framing quite right.
Export & Publish. I tend to use PNG format as its lossless and has an overall decent file size. JPEG is good too as the files sizes are very small however it is not lossless. Social Media sites use proprietary image converters and JPEG in certain cases turn out bad (colors off, blurry, rescaling issues, etc...).


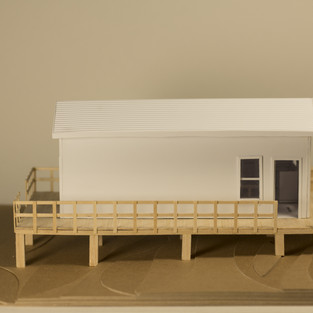
Below is what I came up with:


I hope you enjoyed & learned from this series of blogs on building a physical model. A believe they still have a place in our digital world.
Until the next one...


Comments