Set Design - Building 1/4 Scale Physical Model - Part 3
- Konstantin Sumtsev

- Jul 27, 2018
- 3 min read
Updated: Aug 3, 2018
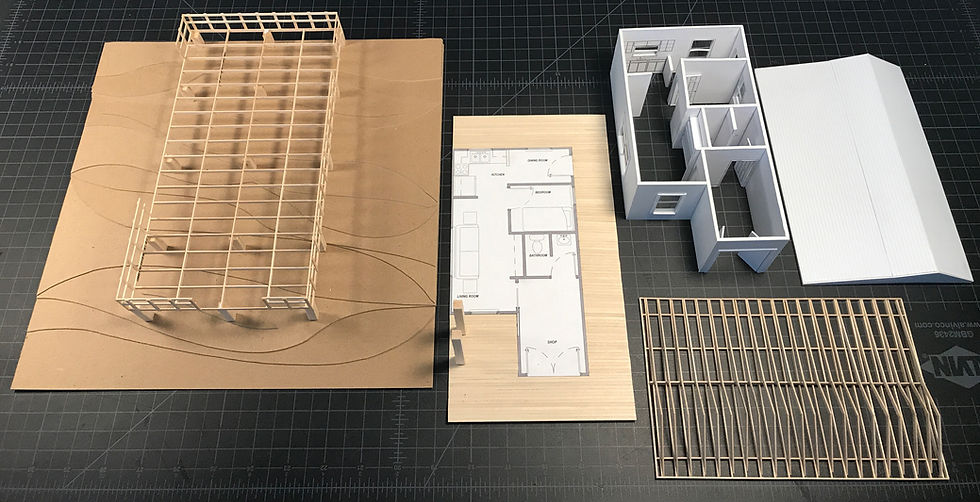
In the previous post we completed the base of the model that included the sea floor terrain, pilings, and deck frame. In this part we will carry on to building railings, the ground floor (showing floor plan), and the roof frame. Lets first begin with building the railings.
1) Similar to the way the deck frame was built, I printed out elevations that I drafted for the railings. This would be my guide to height and spacing. I used balsa wood (3/32 x 1/32 x 24), which I cut to proper scale dimensions using my guide and assembled each segment using the magnetic gluing jig, magnets, and Elmer's Carpenter's Wood Glue. I let it dry for about 30 minutes before applying it to the deck frame. This was long enough for it to stick firmly without a chance of falling off. Once attached, I left it to dry overnight for maximum strength.


2) Now, let move onto the ground floor. First, I printed out the floor plan (in 1/4 scale) as a vector graphic on a laser printer (consumer grade) on a 90 (g/m²) paper. This will ensure sharp lines and would be less likely to smudge then being printed on ink jet (which still would work well). Then, I cut out balsa wood (3/32 x 1/32 x 24) into measured strips that would become deck planks. A bit of a time consuming part but it gives a realistic look and accurate material scale. I glued the strips onto the printed floor plan using wood glue. Tip #1: Using a toothpick instead of a brush to spread glue works really well as it evenly pushes it across the entire piece. I sanded down any uneven edges. I then cut Evergreen Polystyrene (0.30" Thick (0.75 mm)) to the size of the cabin floor and glued another floor plan that I printed off using Elmer's White Glue. You see-it’s not just for elementary school projects. I'm using polystyrene since it is a smooth surface and if I choose l have the option to glue down the walls perfectly on top of it since they are made from the same material. Tip #2: Make sure to keep your hands clean and wash often as marks can appear easily on white paper especially on the presentation side.


3) As the glue dries we can start working on the roof frame. I was most excited to work on this as it forced to me to really study the way roofs are constructed during the drafting stage and I was excited to build a model of it. My references for this were Architectural Graphic Standards, 10th Edition by John Ray Hoke, Jr., and Charles George Ramsey & Building Construction Illustrated, 5th Edition by Francis D. K. Ching. I began with printing a plan & elevations draft and laid out measured balsa wood (1/8 x 3/64 x 24) pieces inside the magnetic gluing jig (similar to the deck frame & railings). I glued everything with Elmer's Carpenter's Wood Glue. Take your time as you can see in the image below there are lots of pieces. Tip: I used tweezers to place small pieces of balsa wood as my hands were a bit too shaky. Due to their small size they bonded fairly quickly.


By this point you are beginning to master the use of balsa wood. It's a very versatile material and you can build pretty much anything with it. Additionally, I really enjoy the way it reflects to 9-Watt (60-Watt Equivalent) Soft White (2700 Kelvin) LED light that I will be lighting the model for Part 5 (Photography & Lighting for Presentation / Portfolio). Stay tuned!
In Part 4 we will be building walls, doors, windows, casings, built-in bookshelves, window sills, and the roof using Evergreen Polystyrene.


Comments